
I used to think lag was just something you lived with on certain games, especially anything competitive, where every server outside your region adds another twenty milliseconds that you cannot do anything about. Then a stutter cost me a clutch round in CS2, and I decided I was done accepting it as normal.
That is when I actually sat down and learned how to use Smart Game Booster properly, instead of just installing it and hoping it worked in the background. Here is exactly what I did, what it changed, and what the tool actually includes.
Why Lag and Low FPS Happen in the First Place
Before getting into the fix, it helps to understand what is actually causing the problem, since lag and low FPS are not always the same issue wearing different names.
Lag usually comes from network latency, meaning the time it takes data to travel between your PC and the game server. High ping, packet loss, and peak-hour congestion on shared routes are the usual culprits. Low FPS, on the other hand, is almost always a hardware or system resource problem, where background apps, outdated drivers, or an unoptimized GPU are eating into the performance your game actually needs.
Most tools I tried before only addressed one side of this. Smart Game Booster is built around the idea that you need to fix both at the same time, which is the whole point of its one-click dual optimization approach.
Step-by-Step: How I Fixed My Lag and FPS Issues
The process was faster than I expected, and there was nothing complicated about it from start to finish.
Step 1: Open Smart Game Booster
Once you open Smart Game Booster, the first thing you’ll see is some popular games such as Call of Duty, Fortnite, and Valorant.
Step 2: Choose a Game to Boost
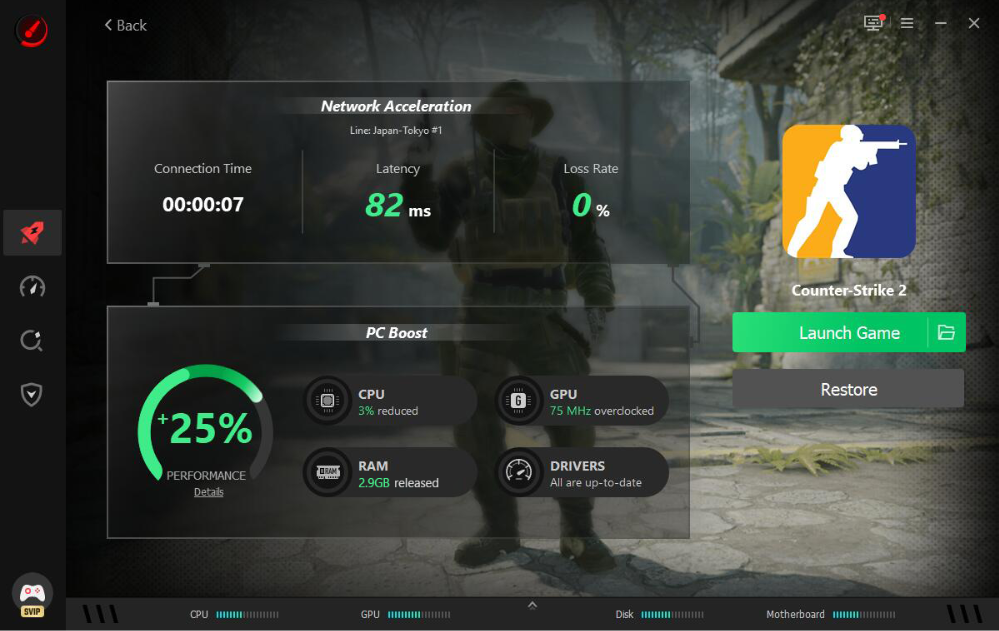
I selected CS2 from the game list, and the app immediately began optimizing both my PC performance and my internet connection at the same time.
Step 3: Let Auto Boost and Super Boost Do Their Job
Auto Boost detected the game launch and switched into Gaming Mode automatically, closing unnecessary background apps without me having to remember to do it manually. Super Boost overclocked my GPU and VRAM in the background, which is where most of the FPS gain actually came from.
Step 4: Enjoy High FPS and Low Ping Gaming
Once everything kicked in, I was looking at a noticeably smoother frame rate and a much more stable ping throughout the match instead of the usual late-round spike that used to throw my aim off completely.
The Features That Actually Fixed My Lag and FPS Problems
Here is a breakdown of what is doing the actual work under the hood, since the one-click button is really just triggering a handful of specific tools.
Network Acceleration
With over 500 game acceleration servers worldwide, this is the feature responsible for reducing my ping specifically. Dedicated game lines cut latency and packet loss and noticeably reduce the peak-hour congestion that used to spike my ping right when matches got competitive.
Super Boost
This overclocks the GPU and VRAM to boost PC performance, and it is the main reason my FPS climbed in GPU-intensive titles. It works quietly in the background once enabled, with no manual tuning required, and it is safe.
PC Boost
A one-click feature that disables unnecessary background apps and services, freeing up CPU and RAM that were previously being eaten by Chrome tabs and Discord overlays I forgot were even open.
Auto Boost
This automatically detects when a game launches and instantly enables gaming mode, which removes the manual pre-game routine I used to go through every single session.
Performance Tools (System Clean, System Tweak, Driver Update, Game Defrag)
These run as part of the broader Performance feature, cleaning up the system, tweaking settings, updating drivers, and defragging games for more consistent long-term performance rather than just a one-time boost.
Can I Run It
A compatibility database covering 160,000-plus games, 3,000-plus GPUs, and 9,000-plus CPUs. I used this before buying a new title to check whether my rig could actually handle it properly.
Real-Time Monitor
Tracks hardware temperature and usage in real time and sends alerts if things overheat, which has genuinely saved me from a couple of close calls during longer sessions.
Guard
Provides security for both your PC and your gaming accounts, including diagnosing overall PC status, which matters given how often gaming accounts specifically get targeted.
What I Liked
After using it consistently across several different titles, here is what stood out the most.
- One-click optimization that handles both hardware and network without needing two separate tools
- The built-in customizable overlay can track live FPS, CPU/GPU temperatures, and usage rates without leaving the game.
- Safely overclock the GPU and VRAM for a risk-free performance upgrade.
- Auto Boost removes the manual step of closing background apps before every session.
What Could Be Better
- FPS gains were noticeable but did not hit the advertised numbers in every single game I tested
- The interface has a learning curve if you want to go beyond Auto Boost and tweak settings manually.
- Network acceleration results vary depending on the region and which specific game you are playing, and it needs to upgrade to SVIP.
My Honest Verdict
The simple truth is that most lag and FPS issues do not have one single cause, which is exactly why most single-purpose tools only solve half the problem. Game Booster fixed both sides of mine in a way that actually held up across multiple sessions, not just the first one.
If lag or stuttering FPS has been costing you matches, this is worth testing on your most-played game first and judging it on your own results.